Arduino Drone


Many of you face a problem when it comes to Flight Controller which is the brain of the Multirotor. There are plenty of ready-made pre-flashed Flight controllers in the market for cheap, But have you thought of building your own Flight controller with your Arduino? So this is the right place to understand and build your own Flight controller for your Quadcopter or Multirotor with your Arduino.
Now the questions come, Where and how do I get the code for the quadcopter? So the answer is Multiwii.
MultiWii is a Very popular flight controller software for DIY Multi-rotors with a large community. It has Support various Multi-copters with advanced features such as Bluetooth Control by your Smartphone, OLED Display, Barometer, Magnetometer, GPS position hold and return to home, LED strips and many more. So let’s build our Flight controller using Arduino!
Add TipAsk QuestionCommentDownload
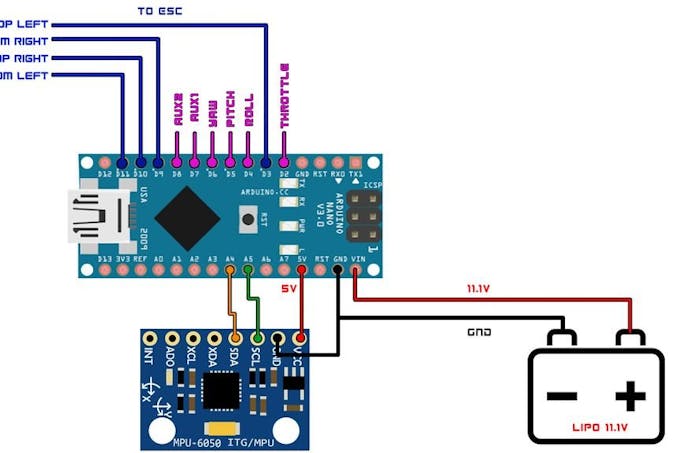
Here are the Schematics for the flight controller board. you can make one on your general purpose PCB or can Order a PCB from manufacturer as I did.
ESC Connections
Bluetooth Module Connections
MPU-6050 Connections
LED Indiacator
Receiver Connections
Add TipAsk QuestionCommentDownload
I bought a DJI 450 frame and attached my motors and everything on it. Yo can see the video on how I did it.
Add TipAsk QuestionCommentDownload
First Download the Multiwii Code from the Below Download Link.
Multiwii Quadcopter Configuration
Extract ‘Multiwii_2.4.zip’ that you downloaded and Open it, now open the Multiwii Folder.
Multiwii Quadcopter Configuration
Search for Multiwii File with ‘.ino’ or File type specified as ‘Arduino File’ using Arduino IDE.
(Don’t open any ‘H File’ or ‘CPP File’ those are the support files for our Multiwii Code, Only open Multiwii.ino File)
Multiwii Quadcopter Configuration
After opening the Muiltiwii.ino file in Arduino IDE you will see many tabs Alarms.cpp, Alarms.h, EEPROM.cpp, EEPROM.h and many more.
Multiwii Quadcopter Configuration
Out of those many Tabs search for Config.h and Open it.
Multiwii Quadcopter Configuration
After you open the Config.h Tab Scroll down till you find ‘The type of multicoptor’
Search for the type of Multi-rotor you are Building and Uncomment it.
For example, I’m building Quadcopter with X configuration so I will uncomment QUADX by removing the ‘//’ before ‘#define QUADX’, similarly you can do it with your type of Multirotor.
Multiwii Quadcopter Configuration
Again scroll down till you find ‘Combined IMU Boards’ and uncomment the type of your Gyro+Acc Board.Mine was GY-521 so I uncommented GY-521. You can even add more sensors like BMP 180 barometer or SRF-04 Ultrasonic sensor and many more by uncommenting them in this section.
Multiwii Quadcopter Configuration
Scroll down again till the ‘Buzzer Pin’ setup and uncomment it.
Multiwii Quadcopter Configuration
Scroll again and Find ‘Buzzer’ and uncomment the first 3 options.this are for Flight indicator Purpose.
Similarly, you can add many features like OLED Display, LCD Display, GPS etc just by uncommenting them in the config.h.Now the Code has to be flashed to Arduino.
Programming Arduino with Quadcopter Code
Remove the Arduino from the Flight controller Board and connect it to your computer via USB Cable.Don’t connect the Arduino directly while it is on the Flight controler Board, always remove it and then connect.
Select Your Arduino Board
Go to Tools>>Board Manager and Select the Arduino that You are Using.In my case, it’s Arduino Nano.
Select COM Port
Now go to serial Port and select the COM Port to which your Arduino Nano is connected to.
Upload the code by Clicking on the Arrow Symbol as shown in above Image, and wait for the code to get Uploaded.
Connecting Flight Controller to Computer
Once the code is Uploaded Disconnect the Arduino From Computer and place it again on to your Flight Controller.Connect your Receiver to the Respective Headers.connect the 5V Battery to power ON the Flight controller.
I connected all ESC’S to Flight Controller Because I used the ESC’s to provide 5V to all parts of the Flight Controller i.e using the BEC (Battery Eliminator Circuit) of the ESC.So I didn’t use any external 5V Battery.
The Led Indicator Blinks, this indicates that the Flight Controller has Booted.
Now connect the Flight controller to the Computer via USB Cable and let’s see how it is performing.
Multiwii Quadcopter Configuration
After the connecting the flight controller to the Computer, Open the Multiwii 2.4 Folder >> MultiwiiConfig Folder.
Multiwii Quadcopter Configuration
Now open the Folder which will be compatible with your Operating system, mine is 64bit Windows so I will open ‘application.windows64’ Folder.
Multiwii Quadcopter Configuration
Run the MultiwiiConfig Application
Multiwii Quadcopter Configuration
Select the COM port to which your Arduino is connected and then click on Start.
Multiwii Configurator
Now You can see the Live Flight controller Data in the MultiwiiConfig.Moving your Flight Controller will reflect the Gyroscope and Accelerometer Data on Screen.You can see the Orientation of your Flight Controller at the Bottom Right.
Here we can Tweak the PID values of the Flight Controller for a Smooth Flight.We assign various Flight Modes to the Auxillary Switch from here.
Moving the Transmitter sticks will show the values of respective Channels.The Respective Motor Speeds are shown on the Right Box.
Just attach your Flight Controller to your Multirotor and it is ready to Fly!!!
Happy Flying!

How to Take Care of Your Hair During the Winter Season(hair care tips for winter) W…


![Download Antim: The Final Truth (2021) Hindi Movie Cam-Rip || 480p [400MB] || 720p [1GB] || 1080p [2GB]](https://lh3.googleusercontent.com/blogger_img_proxy/AEn0k_tjlH4xVD8dLLO1FMA__y-iZNfbJwqz2mK1PWpVbQVhZW3E4Jx5ZuXXCt4fOeDmk_-L2G6dcaSrZh6HlyABZSJPwZGUhZDoRNIU9EIoyK0zBQ5HXxQ5kH0G3w-GEqe84Y9QqpSHeTiQa6ex=w72-h72-p-k-no-nu)
![18+Download All Ladies Do It (1992) Full Movie [In Italian With English Subs] WEB-DL 480p [350MB] || 720p 10BIT HEVC [500MB] || 720p [800MB] || 1080p [2GB]](https://blogger.googleusercontent.com/img/a/AVvXsEgp5Z5uySC3woxAW9a2FV1jV3HAoAFfldsvOX7rDp6LmwhkKPAnHW1ax-8x9DfuAD1VO-QxZjMD3f306FKxu4R82x_y4Bp4JUhjJ17wf3E3BeTBS3uPOmSgC5b3mYUgaTA605WrYB7lEqe-9erbQTPcQZPWNwfqSpG7k4J09WsYNDvIu-LYy7VpEb6skw=w72-h72-p-k-no-nu)
![Download Red Notice (2021) Dual Audio {Hindi-English} WeB-DL 480p [500MB] || 720p [1GB] || 1080p [3.7GB]](https://blogger.googleusercontent.com/img/a/AVvXsEitiYVZrfz3LRXaBbIo8hY9-1DAZf-OnTeuwFprvV0QKlP09hCZPgwRDYDwrTLJh1TByJfBu5xv0gGss_DfNDkDhZuhtnKzpnhenPVSQgK84ig4oUKtiOP36EyFWWxdAkO8AhSTV_R8i1dGaXHiy6ReOvzuHBHNBXGbb4yubY-WCfUuk178t30IysDfiA=w72-h72-p-k-no-nu)


![Download Eternals (2021) CAMRip V2 [Hindi & English] 480p [450MB] || 720p [1.1GB]](https://blogger.googleusercontent.com/img/a/AVvXsEjSk3eYxYp0OsH_bENzmEPcCS1rHDOobr74C0XIwQ1lgfO9BZi0hGIxSvEEHtypT3gkBRbSVAfhR9yUhTOJuw-jIYFmh3BBv6iGacXOMmikzCk9jD6Seha46-dpfDUY6bo9ZA60Ivt7uns3xNyoVpTtTejnaic6UzyhtcPuasTGQQV1YlCdBOpk7T1rCg=w72-h72-p-k-no-nu)
![Download 18+ A Man and A Woman (2016) Dual Audio (Hindi-Korean) 480p [400MB] || 720p [950MB] || 1080p [2.1GB]](https://lh3.googleusercontent.com/blogger_img_proxy/AEn0k_uAl21FLPx2uq92uf2ib8fNHQ9DIWVQrjetnh3UXHpRdylQNIFhYCwa0zVsv4coF9jex6r-XCDrBCE9nq3p5vHk_TN-3okK8wonfbuO8quY4IabkTuGO6J_Hg=w72-h72-p-k-no-nu)

0 Comments